Get the essentials
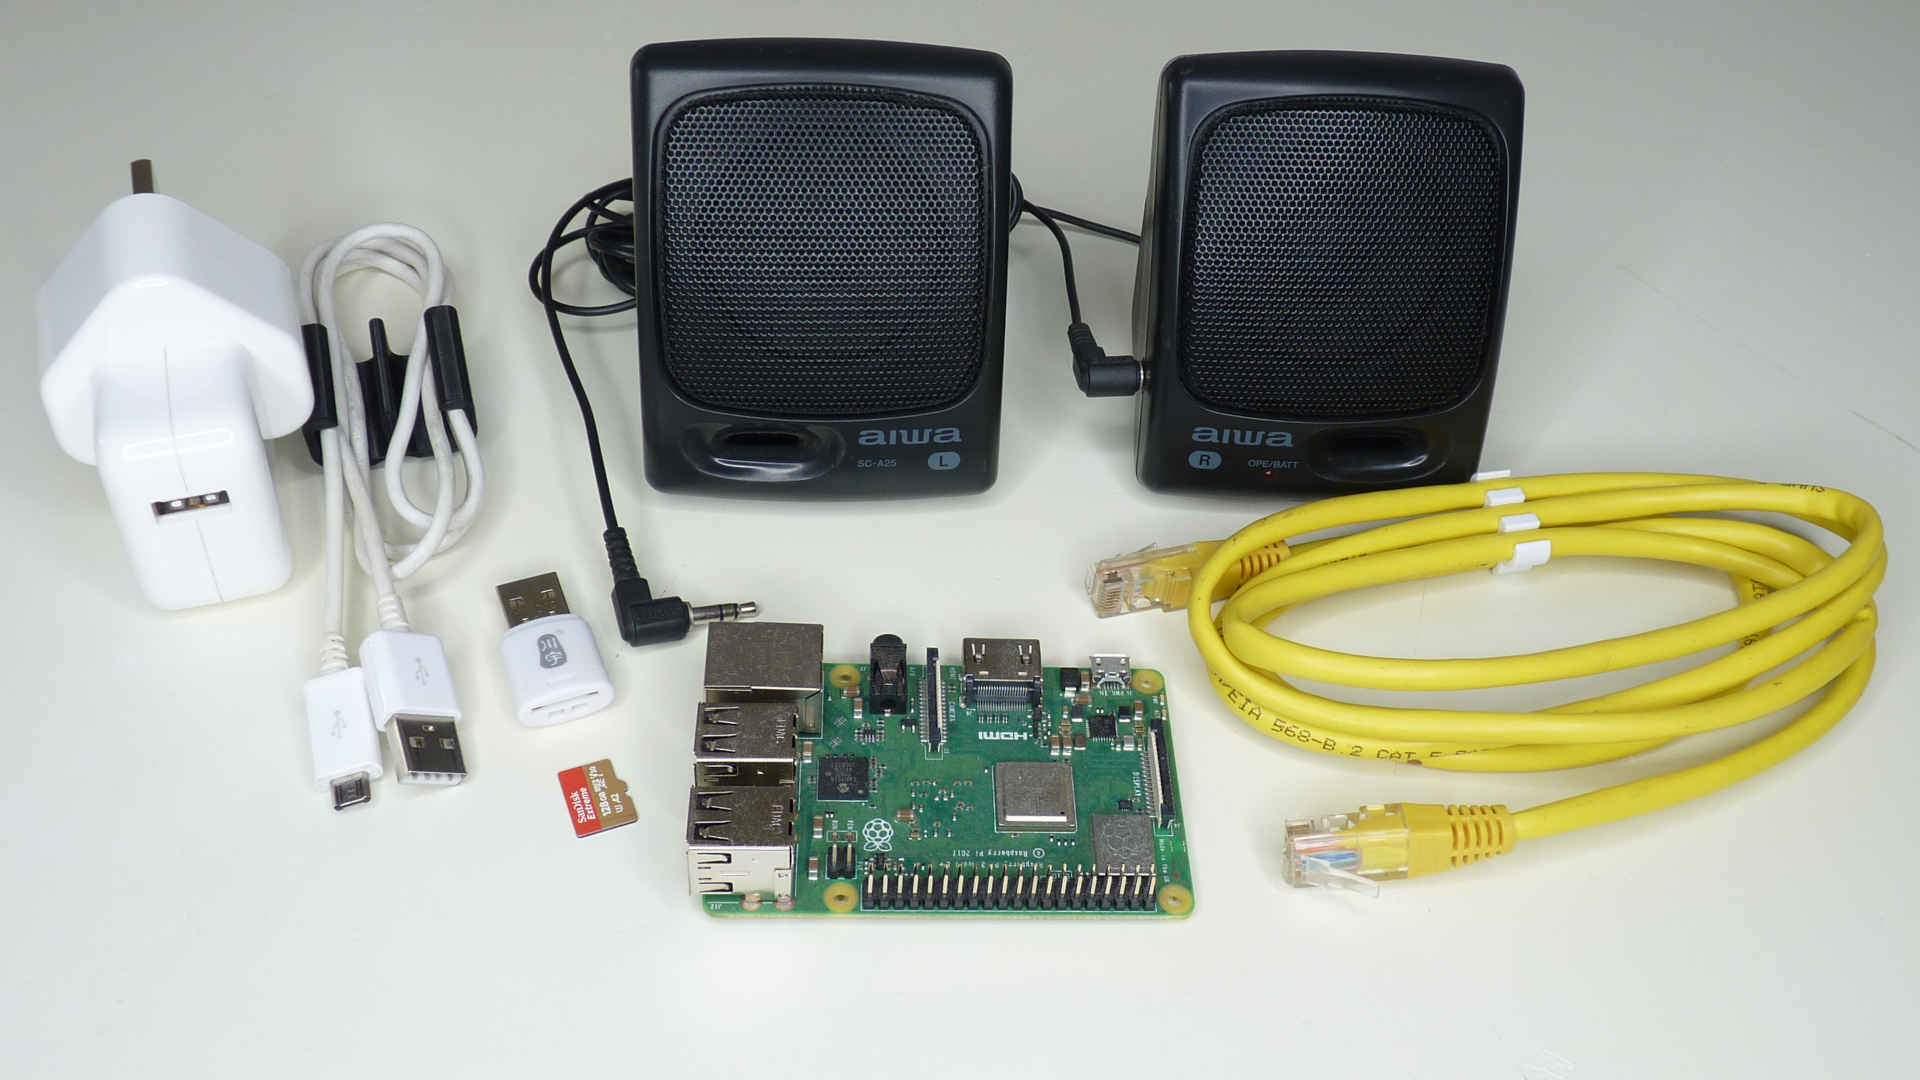
To get started you’ll need some hardware:
- a Raspberry Pi
- speakers or headphones
- an Ethernet cable, unless you have WiFi
- a Secure Digital (SD) card
- a SD card reader
- a power supply
Check your Rasperry Pi model
Check which model of Raspberry Pi you have. The model number is printed on the circuit board.
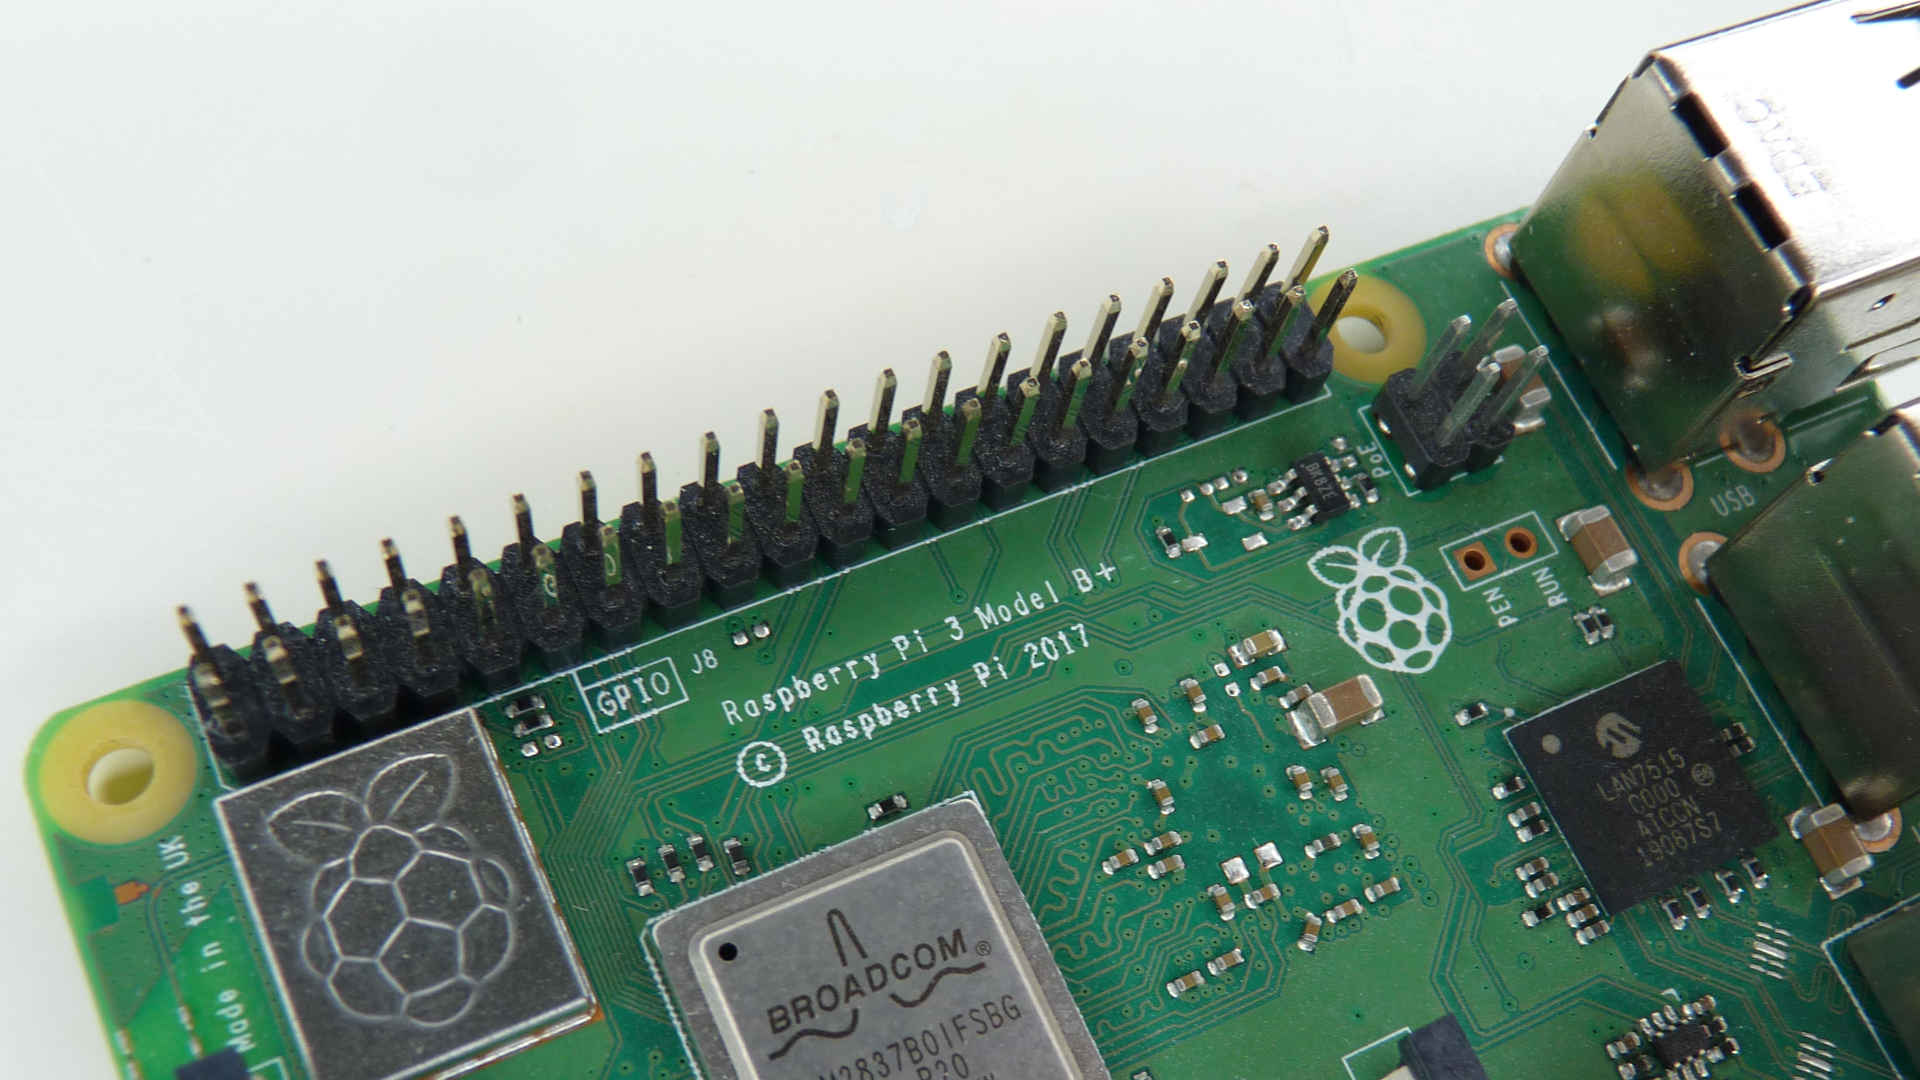
Different models of the Raspberry Pi support different audio features. For example, the photo shows a Raspberry Pi 3 Model B+. This model supports WiFi and Bluetooth. It also features an Ethernet port, a 3.5 mm audio jack socket and several Universal Serial Bus (USB) ports. The WiFi or the Ethernet port can be used to receive internet radio stations. Bluetooth can be used to connect to a Bluetooth speaker or Bluetooth headphones. The 3.5 mm audio jack can be connected to speakers. One of the USB ports can be connected to USB speakers or a USB digital-to-analogue converter (DAC).
Older Raspberry Pi models do not have WiFi or Bluetooth support, so you will need an Ethernet cable to use these. Very new models, such as the Raspberry Pi 5, do not have a 3.5 mm audio jack socket so will not connect to some speakers.
Prepare the SD card
In this step you’ll install the Raspberry Pi Operating System (OS) on the SD card.
First, ensure that there is no data on your card that you want to keep. All data on the card will be erased during this step!
Use a computer, any computer, to download the Raspberry Pi Imager. Install the Raspberry Pi Imager and then launch it.
The Raspberry Pi Imager will ask you to choose a device, an operating system and storage. Ensure you have an internet connection as it will download the operating system from Raspberry Pi.
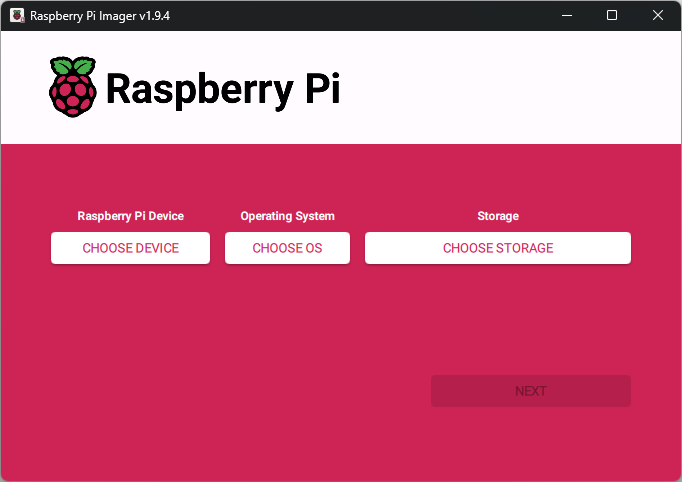
The Raspberry Pi Imager needs to know which model of Raspberry Pi you have. Click CHOOSE DEVICE and select your Raspberry Pi model from the list.
Now choose an operating system for your Raspberry Pi. To use a Raspberry Pi as a radio the Lite version of Raspberry Pi OS is sufficient, though other versions of Raspberry Pi OS will also work. Click CHOOSE OS, then Raspberry Pi OS (other), then Raspberry Pi OS Lite (64-bit).
[!TIP] Eject any external USB devices from your computer before proceeding. This reduces the risk that you accidently write to the wrong device.
Tell the Raspberry Pi Imager which drive to write to. Click CHOOSE STORAGE and list of devices will appear. Now put your SD card into the SD card reader and plug it into your computer. A new device will appear in the list, select it. Make certain you have selected the right device as all data on it will be erased! If in doubt, eject any other USB devices that appear in the list to ensure you don’t accidently overwrite them. Once you’re certain, click NEXT.
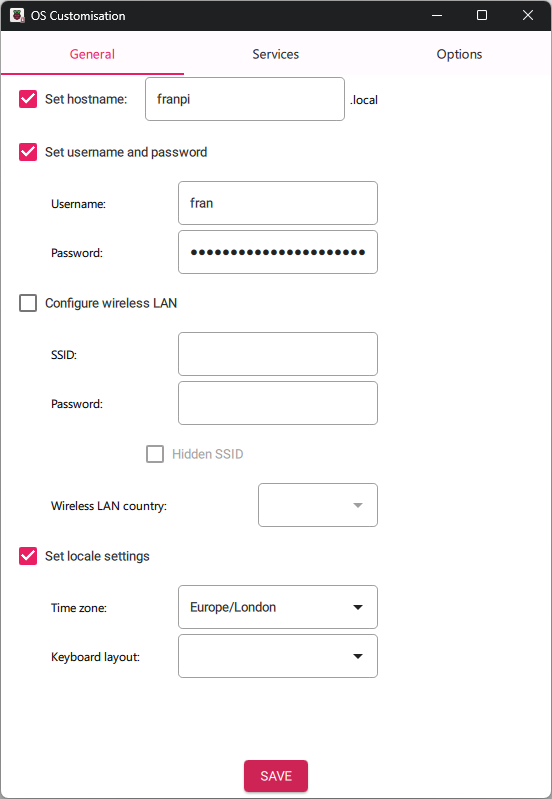
The Raspberry Pi Imager will ask Would you like to apply OS customisation settings?. This is an opportunity to do some basic setup of the Raspberry Pi before switching it on for the first time, so click EDIT SETTINGS. The OS Customisation window appears.
Choose a hostname for your Raspberry Pi. This will be the name you use to connect to your radio. Check Set hostname and enter your chosen hostname.
Set up a username and password. Click Set username and password, then enter a username and password.
If you want to connect your Raspberry Pi to your WiFi, chcek Configure wireless LAN and enter your network’s service set identifier (SSID). This the name of your network, exactly as it would appear on a phone or a computer. Enter your WiFi password. If you are connecting with an Ethernet cable you do not neet to configure the wireless.
Click Set locale settings and choose your time zone. Leave the Keyboard layout blank.
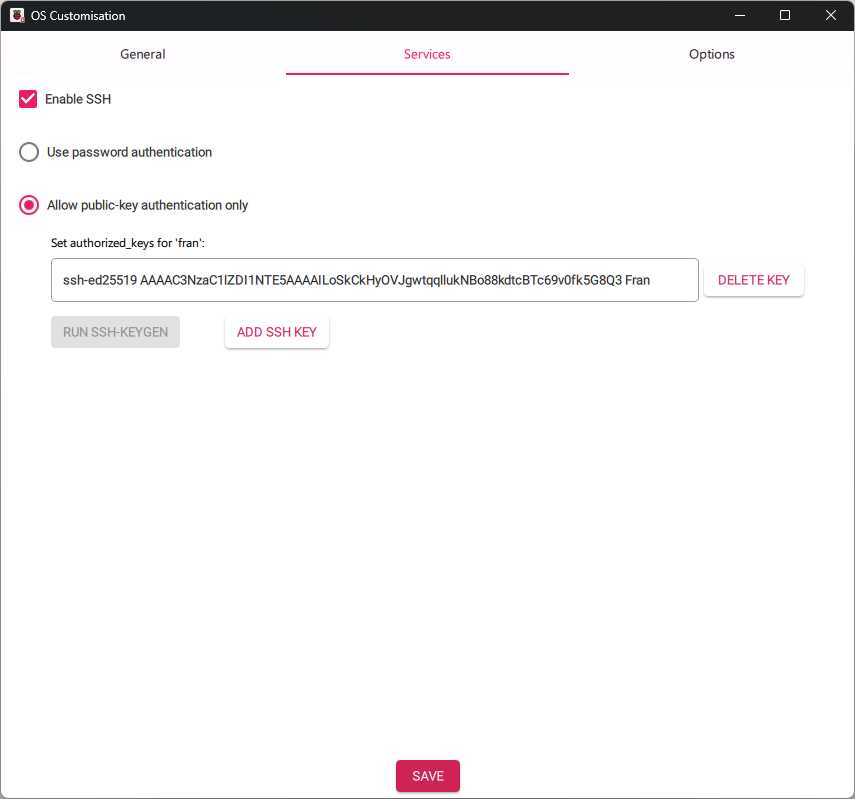
Click on the Services tab. This is where you’ll set up Secure Shell (SSH) to allow you to set up your Raspberry Pi from your computer. If all goes to plan, you won’t ever need to connect a screen or keyboard to your Raspberry Pi.
Click Enable SSH. You now have two choices for how you will log in to your Raspberry Pi over the network. You can authenticate with the password you entered on the General tab. Alternatively you can use a public-key. You can chooose either option. Using a public-key is more complex to set up but means you will not need to type your password every time you log in to your Raspberry Pi.
To set up public-key authenticaion, click Allow public-key authentication only. If you don’t already have a public-key you can generate one on your computer.
Open PowerShell if you are using Microsoft Windows, or Terminal if you are running Linux. Type:
ssh-keygen -t ED25519 -f "id_franpi" -C "Fran"
replacing id_franpi with the filename you would like to use for your key. It’s a good idea to use a filename that starts with id_. Replace the key’s comment, Fran, with a name that identifies you. ED25519 is the type of the key. ssh-keygen will ask you to enter a passphrase
Generating public/private ED25519 key pair.
Enter passphrase (empty for no passphrase):
If you enter a passphrase here it will be used to encrypt your key to keep it secure. Alternatively you can leave the passphrase empty for less security but more convenience. ssh-keygen will ask you to repeat your passphrase
Enter same passphrase again:
Your identification has been saved in id_franpi
Your public key has been saved in id_franpi.pub
The key fingerprint is:
SHA256:bm7xHRuT1wQWqc53BxmnUNdqE6xdIRaR8+WRnivg7+c Fran
The key's randomart image is:
+--[ED25519 256]--+
|             B*+=|
|            ooO+=|
|             *+@+|
|           .o O+o|
|        S .o.o =.|
|       ..  .B.o.+|
|        oo ..B...|
|       o. . o. . |
|       ..   ..oE |
+----[SHA256]-----+
Two new files will have been created. Have a look at them by typing
ls id_*
to show the directory listing
Mode                 LastWriteTime         Length Name
----                 -------------         ------ ----
-a----        2025-07-05     19:31            387 id_franpi
-a----        2025-07-05     19:31             87 id_franpi.pub
id_franpi is a private key file. This key stays on your computer. Keep it private!
id_franpi.pub is a public key file. Have a look at its contents by typing
cat id_franpi.pub
The contents of the file are your public key
ssh-ed25519 AAAAC3NzaC1lZDI1NTE5AAAAILoSkCkHyOVJgwtqqllukNBo88kdtcBTc69v0fk5G8Q3 Fran
You can also find out the public key directly from the private key (id_franpi) by typing
ssh-keygen -yf id_franpi
which will show
ssh-ed25519 AAAAC3NzaC1lZDI1NTE5AAAAILoSkCkHyOVJgwtqqllukNBo88kdtcBTc69v0fk5G8Q3 Fran
Copy and paste your public key into the text box (Set authorized_keys...) in the Raspberry Pi Imager.
Click the Options tab if you’d like to change what happens once the write is complete.
Click SAVE, then click YES to apply your OS customization settings.
A warning will appear to tell you that all existing data on your device will be erased. If you are certain you chose the correct device, your SD card, click YES.
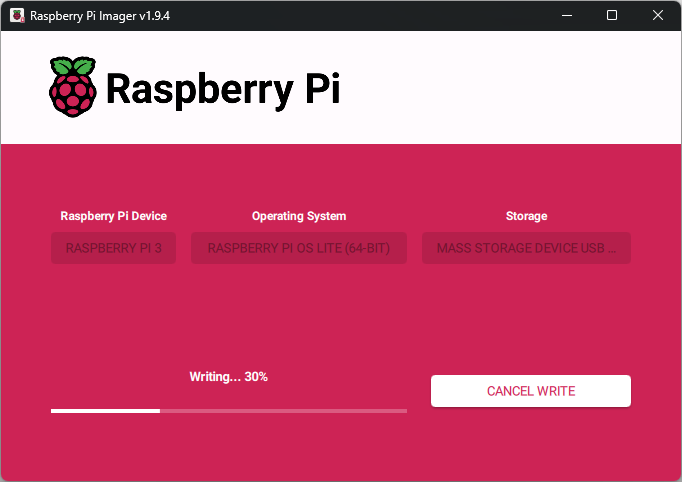
The Raspberry Pi imager will write the operating system and your customization to the SD card. It will then verify that all the data was written correctly. If you chose Raspberry Pi OS Lite this process will take a few minutes. Once complete, you will see the message You can now remove the SD card from the reader. Click CONTINUE, close the Raspberry Pi Imager and remove your SD card.
You are now ready to boot your Raspberry Pi!
Connect
Plug in your Raspberry Pi and let it boot. This may take several minutes.
Then type
ssh -i id_franpi fran@franpi
where id_franpi is your private key file, fran is the username you set up and franpi is the hostname you set.
Install audio software
Now install some audio software.
PipeWire is a framework for handling audio streams on the Raspberry Pi. It has a utility called WirePlumber that makes it easier to work with PipeWire streams.
The Music Player Daemon plays radio streams. It has a utility called Music Player Commander that makes it easier to control.
Install these three with
sudo apt update
sudo apt install pipewire wireplumber mpd mpc
Now start PipeWire
systemctl --user start pipewire
Connect the speakers.
Audio streams are identified by a number. To find out the number of the speakers run
wpctl status
The output shows various audio devices.
PipeWire 'pipewire-0' [1.2.7, fran@franpi, cookie:812395030]
 └─ Clients:
        33. WirePlumber                         [1.2.7, fran@franpi, pid:3676]
        34. WirePlumber [export]                [1.2.7, fran@franpi, pid:3676]
        68. wpctl                               [1.2.7, fran@franpi, pid:3813]

Audio
 ├─ Devices:
 │      53. Built-in Audio                      [alsa]
 │      54. Built-in Audio                      [alsa]
 │
 ├─ Sinks:
 │  *   63. Built-in Audio Stereo               [vol: 0.40]
 │
 ├─ Sink endpoints:
 │
 ├─ Sources:
 │
 ├─ Source endpoints:
 │
 └─ Streams:
Below this are Video and Settings but these aren’t important just now.
In PipeWire jargon, a place where audio is output from your Raspberry Pi is a sink. The output of wpctl status shows that device 63 is a sink, described as the Built-in Audio Stereo. This is the 3.5 mm audio jack socket on the Raspberry Pi. It also shows that the volume is set to 0.40, which means 40 %.
Play a sound by typing
pw-play /usr/share/sounds/alsa/Noise.wav
If it’s too quiet, turn up the volume
wptcl set-volume 63 100%
pw-play /usr/share/sounds/alsa/Noise.wav
replaing 63 with the number of your sink.